


Image Buffer
Data Buffer structure for BGR
When working with image processing, it can be handy to have direct access to an image buffer
(such as a BufferedImage) that can rendered to a component paint
method.
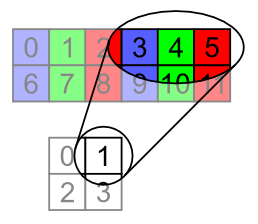
The image to the right shows the data buffer structure for a 2x2 image using BGR (blue, green, red) colour components. The data buffer is one dimensional, each set of 3 pixels encodes consecutive pixels.
The code block below shows how to create a BufferedImage from a byte array. The most important
part is the instantiation of the PixelInterleavedSampleModel:
| Argument | Description |
|---|---|
DataBuffer.TYPE_BYTE | The data type of the image buffer elements |
width | The width of the image |
height | The height of the image |
3 | The number of data buffer elements per pixel |
3*width | The number of data buffer elements per line |
new int[] {2,1,0} | The location of colour components for each pixel |
The last argument is quite important as it defines how the colour components are read from the
data buffer. In this case the colours are ordered blue, green then red. If you wanted RGB (red,
green, blue), the argument would be int[] {0,1,2}.
createImage.javaint width = 100; int height = 100; int numPixels = width * height; byte[] data = new byte[numPixels]; DataBufferByte dataBuffer = new DataBufferByte(data, data.length); PixelInterleavedSampleModel sampleModel = new PixelInterleavedSampleModel(DataBuffer.TYPE_BYTE, width, height, 3, 3*width, new int[] {2,1,0}); ColorSpace cs = ColorSpace.getInstance(ColorSpace.CS_sRGB); ColorModel colourModel = new ComponentColorModel(cs, false, false, Transparency.OPAQUE, DataBuffer.TYPE_BYTE); WritableRaster raster = Raster.createWritableRaster(sampleModel, dataBuffer, new Point(0,0)); BufferedImage image = new BufferedImage(colourModel, raster, false, null);
Once you've got your image, it's easy to use it in a component's paint method. When you alter the data buffer,
you just need to call the component's repaint method.
public void paint(Graphics g)
{
   g.drawImage(image, 0, 0, this);
}
