


Linux Tool Chain
Compiler Tool Chain
Compile and install binutils:
> wget http://ftp.gnu.org/gnu/binutils/binutils-2.19.1.tar.bz2
> tar -xjf binutils-2.19.1.tar.bz2
> cd binutils-2.19.1
> ./configure --prefix=/opt/avr --target=avr --disable-nls
> make
> make install
Add binutils to PATH:
NOTE: If you are compiling (make) as a user and installing (make install) as root, as you should be, remember to set the PATH for both users.
> export PATH="/opt/avr/bin:$PATH"
Compile and install GCC (Note: In this case compilation needs to be done in the separate objdir directory)
> wget ftp://ftp.mirrorservice.org/sites/sourceware.org/pub/gcc/releases/gcc-4.3.3/gcc-core-4.3.3.tar.bz2
> tar -xjf gcc-core-4.3.3.tar.bz2
> mkdir objdir
> cd objdir
> ../gcc-4.3.3/configure --prefix=/opt/avr --target=avr --enable-languages=c --disable-nls --disable-libssp --with-dwarf2
> make
> make install
Compile and install avr-libc:
> wget http://download.savannah.gnu.org/releases/avr-libc/avr-libc-1.6.4.tar.bz2
> tar -xjf avr-libc-1.6.4.tar.bz2
> cd avr-libc-1.6.4
> ./configure --prefix=/opt/avr --build=`./config.guess` --host=avr
> make
> make install
Finally, make sure that /opt/avr/bin is permanently added to your PATH.
Simple Test Program
simple.c#include <inttypes.h> #include <avr/io.h> int main(void) { DDRB = 0xFF; // Set Port B to outputs uint8_t data = 0x00; while (1) { PORTB = data; data ++; } }
The commands below will compile the source file and then generate a hex file.
> avr-gcc -Wall -mmcu=atmega128 -o simple.o simple.c
> avr-objcopy -j .text -O ihex simple.o simple.hex
AVR Programming using JTAG and Linux
I've only found one working Linux based method for programming an AVR via its JTAG interface. It's not too elegant, but it works. There are two stages:
- Convert your compiled hex file into a SVF (Serial Vector Format) file using the Atmel utility
avrsvf.exe. - Use the
lmilkutility to 'play' the SVF file and program the AVR
This approach makes use of a Xilinx DLC5 Parallel Cable III. This is a very simple JTAG programming cable. The online schematics make it easy to build your own.
Stage 1: Hex to SVF
The AVR hex to SVF utility, avrsvf,
can be download from the Atmel website. Unfortunately it's a windows executable,
but it works fine with Wine.
Below is a fairly simple example that converts a hex file for a atmega128
device into a SVF file. The generated SVF file will contain the instructions to first
erase the device, then program the flash.
> wine avrsvf.exe -datmega128 -e -ifdata.hex -pf -ovdata.svf
If you've got a more complex JTAG chain than just a single device, you can specify the arrangement. For example, for the chain below the FPGA has a 5bit wide instruction register.
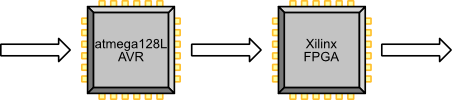
AVR JTAG Chain
This command takes care of the chain and will also set the AVR fuses.
> wine avrsvf.exe -datmega128 -e -ifdata.hex -pf -ovdata.svf -wc1000 -chd1 -chi5
Stage 2: Programming
The lmilk utility hasn't changed for years, but it still seems to work.
> wget http://warmcat.com/milksop/lmilk-0.20.tar.gz
> tar -xzf lmilk-0.20.tar.gz
> cd lmilk-0.20
> ./configure --prefix=/opt/avr
> make
> make install
You need to be root to use the utility
> lmilk -j -p simple.svf
Other Linux JTAG Tools
Another useful Linux friendly JTAG tool is available here http://openwince.sourceforge.net/jtag/. Follow the instructions below:
Note: The newer version of the include package does not seem to work with the jtag program. The trailing
slash on the end of the --with-include part of the jtag configure is important.
First download and configure the include files:
> wget http://belnet.dl.sourceforge.net/sourceforge/openwince/include-0.3.2.tar.bz2
> tar -jxf include-0.3.2.tar.bz2
> cd include-0.3.2
> ./configure
Second, download, configure, make and install the actual JTAG program:
> wget http://switch.dl.sourceforge.net/sourceforge/openwince/jtag-0.5.1.tar.bz2
> tar -jxf jtag-0.5.1.tar.bz2
> cd jtag-0.5.1
> ./configure --prefix=/opt/jtag-0.5.1 --with-include=/files/jtag/include-0.3.2/
> make
> make install
To use jtag as non-root, you need to enable ppdev in your kernel. The option can be found as follows:
-> Device Drivers
  -> Character Devices
    -> <*> Support for user-space parallel port device drivers
Recompile your kernel, and reboot. You should have the device file /dev/parport0.
A JTAG chain detection can be performed as shown below. This example uses a Xilinx DLC5 parallel port cable.
> /opt/jtag-0.5.1/bin/jtag
jtag> cable ppdev /dev/parport0 DLC5
Initializing Xilinx DLC5 JTAG Parallel Cable III on parallel port at 0x378
jtag> detect
Chain length: 1
Device Id: 00101001011000001001000000111111
  Manufacturer: Atmel
    Unknown part!
	 chain.c(110) Part 0 without active instruction
	 chain.c(133) Part 0 without active instruction
	 chain.c(110) Part 0 without active instruction
jtag> quit
