


XUP-V2Pro MicroBlaze Linux
This page describes how to get Linux running on a MicroBlaze processor configured in a Xilinx FPGA. The HowTo is based on the XUP-V2Pro board, but should also be useful for people using other Xilinx boards.
The PetaLinux distribution created by PetaLogix is used. PetaLogix have done a great job putting this together, and their approach really simplifies getting Linux running on FPGA.
Introduction
The PetaLinux distribution contains a Linux kernel, reference hardware systems and a set of
scripts for making the two work together. A good starting point for information is the
developer's wiki which has a lot of
documentation. This howto follows the online documentation, but does not use the flash based boot system,
instead Xilinx' xmd is used to boot the system.
This howto is based on the following:
- Xilinx ISE 10.1.03 (32bit)
- Xilinx EDK 10.1.03 (32bit)
- PetaLinux 0.30-rc1
Note: Even if you have a 64it machine, you need to use the 32bit Xilinx tools.
Setup
The first step is to download the PetaLinux distribution. Grab
petalinux-v0.30-rc1.tar.gz from the developer's wiki.
Unpack the archive to a handy location (in this case /files). Note: this unpacks to about 1.5GB.
> cd /files
> tar-zxf petalinux-v0.30-rc1.tar.gz
Now enter the newly created directory and run the environment setup file. This sets some environment variables and adds the PetaLinux scripts to your path.
> cd petalinux-v0.30-rc1
> source settings.sh
You need to create a new platform using the petalinux-new-platform script.
> petalinux-new-platform -v Xilinx -p Xilinx-XUP-V2Pro -k 2.6
Note: I get a few awk warnings when I run this, but it doesn't seem to cause any problems.
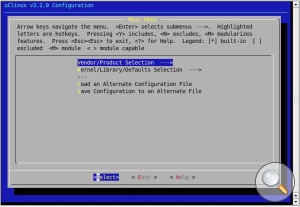
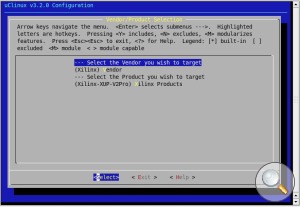
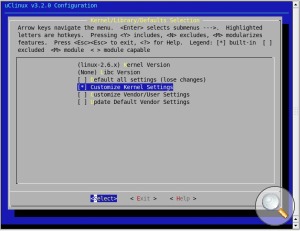
Now you need to select to use this new platform. PetaLinux has a handy interface for this task.
> cd $PETALINUX/software/petalinux-dist
> make menuconfig
Use the two images below to guide your selection.
Hardware Setup
PetaLinux comes with some reference hardware systems. As the XUP-V2Pro isn't one of them, we need to create it.
First create somewhere to hold your new hardware project
> cd $PETALINUX/hardware/user-platforms
> mkdir XUP-V2Pro
> cd XUP-V2Pro
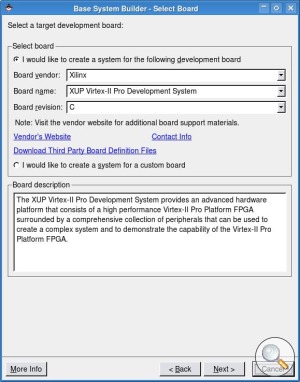
Now you need to use Xilinx Platform Studio to create the base system.
> xps
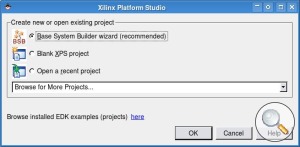
Select the Base System Builder Wizard and click OK.
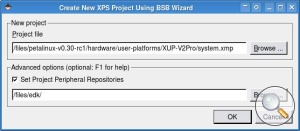
Select the directory created in the previous stage as the location to build the new system, in this case
/files/petalinux-v0.30-rc1/hardware/user-platforms/XUP-V2Pro
Note: You need the board and SDRAM definition files for the XUP-V2Pro board. You can download these
using the link below. Extract the archive and set the Project Peripheral Repositories to the top level folder.
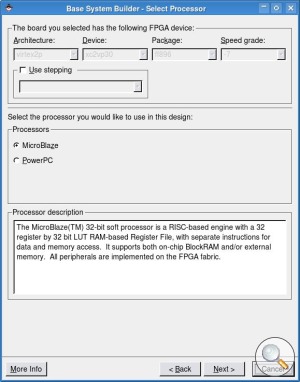
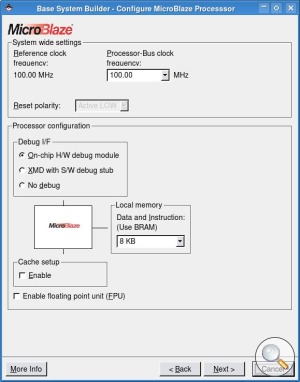
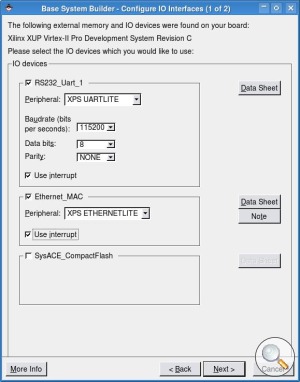
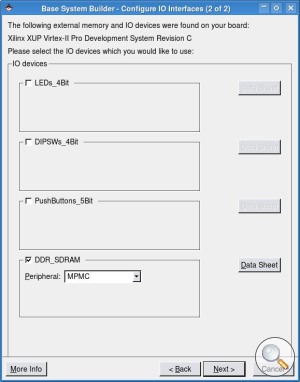
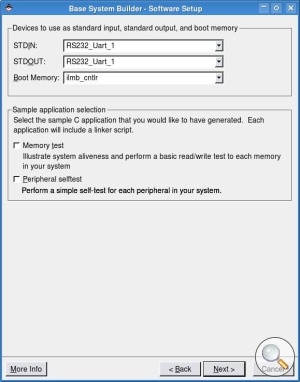
Following the remaining steps illustrated in the images below. This will create a very basic MicroBlaze system. Be sure to include the SDRAM, Ethernet Lite (with interrupt), UART (with interrupt) and Timer (with interrupt).


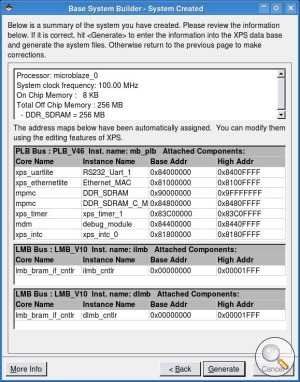
Once you have completed these steps and the generate stage has finished you can exit XPS.
File Adjustments
You need to make a few minor adjustments to the files XPS has created. Adjustments are required in the system.mss
and system.xmp files.
> cd $PETALINUX/hardware/user-platforms/XUP-V2Pro
The lines that need changing are highlighted.
system.mssBEGIN OS PARAMETER OS_NAME = petalinux PARAMETER OS_VER = 1.00.b PARAMETER PROC_INSTANCE = microblaze_0 PARAMETER STDIN = RS232_Uart_1 PARAMETER STDOUT = RS232_Uart_1 PARAMETER lmb_memory = dlmb_cntlr PARAMETER main_memory = DDR_SDRAM PARAMETER main_memory_bank = 0 END
system.xmp
VerMgmt: 10.1.03
IntStyle: default
ModuleSearchPath: /files/edk/:../../edk_user_repository/
MHS File: system.mhs
MSS File: system.mss
Build the Hardware
The next set of steps will actually build the FPGA hardware.
> xps -nw system.xmp
% save make
% exit
> make -f system.make bits
> make -f system.make libs
> make -f system.make init_bram
If you are following the PetaLinux documentation, you'll see that we have missed a step out here.
As we are not using their booting system, we do not need to build the boot application. Instead we
stick with the default bootloop. This makes the MicroBlaze sit in an infinite loop
after configuration which gives us time to download the kernel and file system image to memory.
The petalinux-code-autoconfig copies some files from the hardware section into the software section. This allows
the tools to know how we have configured our hardware platform.
> petalinux-copy-autoconfig
Software Setup
The next stage is to build the Linux kernel and root filing system. First move into the software directory:
> cd $PETALINUX/software/petalinux-dist
Note: There seems to be a mistake in the kernel file linux-2.6.x/scripts/mod/sumversion.c. Open the file
and add #include <limits.h> after #include <string.h>.
linux-2.6.x/scripts/mod/sumversion.c#include <ctype.h> #include <errno.h> #include <string.h> #include <limits.h> // Add this line #include "modpost.h"
You also need to make sure that the Xilinx MicroBlaze gcc tools are in your path.
> export PATH="$XILINX_EDK/gnu/microblaze/lin/bin:$PATH"
Now you can configure the kernel.
> make menuconfig
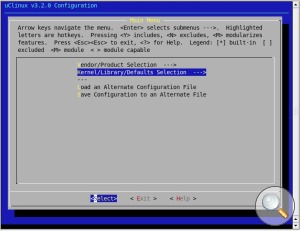
You need to select that you want to alter the kernel configuration, the images below show how to do this. You can also select to alter the software installed in the root filing system, but this can be left as the default.
The kernel options that require changing are listed below.
Device Drivers  --->
  Network device support  --->
    Ethernet (10 or 100Mbit)  --->
      [ ] Xilinx 10/100 OPB EMAC support
      [*] Xilinx 10/100 OPB EMACLITE support
  Character devices  --->
    Serial drivers  --->
      [*] Xilinx uartlite serial port support
      [*] Support for console on Xilinx uartlite serial port
Now you finally get to build the kernel and file system images.
> yes "" | make oldconfig dep all
Hopefully this will complete without any errors. You should now have a set of image files in the
image/ directory. The image.bin file contains the kernel image and the root
filing system.
> ls -al images/image.bin
System Boot
Now you are ready to boot the system. This involves two steps. First configure the FPGA with the MicroBlaze system, next, download the kernel and filing system image to memory.
Before you start, you'll want a terminal listening on the serial port. This will allow you to log
in to your new embedded Linux system. Something like gtkterm or minicom is ideal for this. Note:
The serial port speed has been selected to match that used for the UART in the base system.
> gtkterm --speed 115200 &
Use Xilinx Impact to download the FPGA bit file.
> cd $PETALINUX/hardware/user-platforms/XUP-V2Pro
> impact -batch etc/download.cmd
Now download the image file to memory.
> xmd
XMD% connect mb mdm -cable type xilinx_platformusb port usb21
XMD% dow -data ../../../software/petalinux-dist/images/image.bin 0x90000000
XMD% rst
XMD% con 0x90000000
XMD% exit
If everything has worked, you should see the following.
Linux version 2.6.20-uc0 (ajg112@jtpc03) (gcc version 3.4.1 ( PetaLinux 0.20 Build -rc1 050607 )) #1 Thu Apr 23 15:17:50 BST 2009
setup_cpuinfo: initialising
setup_cpuinfo: No PVR support in CPU.  Using static compile-time info
set_cpuinfo_static: Using static CPU info.
setup_memory: max_mapnr: 0x9ffff
setup_memory: min_low_pfn: 0x90000

setup_memory: max_low_pfn: 0x10000
On node 0 totalpages: 65536
DMA zone: 512 pages used for memmap
DMA zone: 0 pages reserved
DMA zone: 65024 pages, LIFO batch:15
Normal zone: 0 pages used for memmap
Built 1 zonelists.  Total pages: 65024
Kernel command line:
OPB INTC #0 at 0x81800000
PID hash table entries: 1024 (order: 10, 4096 bytes)
Dentry cache hash table entries: 32768 (order: 5, 131072 bytes)
Inode-cache hash table entries: 16384 (order: 4, 65536 bytes)
Memory: 257024k/262144k available
Calibrating delay loop... 1.36 BogoMIPS (lpj=6816)
Mount-cache hash table entries: 512
NET: Registered protocol family 16
NET: Registered protocol family 2
IP route cache hash table entries: 2048 (order: 1, 8192 bytes)
TCP established hash table entries: 8192 (order: 3, 32768 bytes)
TCP bind hash table entries: 4096 (order: 2, 16384 bytes)
TCP: Hash tables configured (established 8192 bind 4096)
TCP reno registered
io scheduler noop registered
io scheduler anticipatory registered
io scheduler deadline registered
io scheduler cfq registered (default)
uartlite.0: ttyS0 at MMIO 0x84000000 (irq = 2) is a uartlite

RAMDISK driver initialized: 16 RAM disks of 8192K size 1024 blocksize
eth0: using fifo mode.
eth0: No PHY detected.  Assuming a PHY at address 0.
eth0: Xilinx EMACLite #0 at 0x81000000 mapped to 0x81000000, irq=1
uclinux[mtd]: RAM probe address=0x9019ef18 size=0xf6000
Creating 1 MTD partitions on "RAM":
0x00000000-0x000f6000 : "ROMfs"

uclinux[mtd]: set ROMfs to be root filesystem index=0
TCP cubic registered
NET: Registered protocol family 1
VFS: Mounted root (cramfs filesystem) readonly.
Freeing unused kernel memory: 88k freed

Mounting proc:
Mounting var:
Populating /var:
Running local start scripts.
Mounting /etc/config:
Populating /etc/config:
flatfsd: Nonexistent or bad flatfs (-48), creating new one...
flatfsd: Failed to write flatfs (-48): No such device
flatfsd: Created 5 configuration files (185 bytes)
Mounting sysfs:
Setting hostname:
Setting up interface lo:
Setting up interface eth0:
Starting thttpd:

uclinux login:
You can log in with username root and password root.
Problems
exit: 13: Illegal number: -1
This error occurs on Ubuntu based systems if your standard shell /bin/sh is actually
/bin/dash. You can easily check using the following command.
> ls -al /bin/sh
The easiest solution is to edit the PetaLinux scripts and change the first line of the script from
#!/bin/sh to #!/bin/bash.
Flatfsd Errors
Not sure.
